Effortless Installation for Stylish Pendant Lighting
This article provides a comprehensive guide to understanding and achieving effortless installation of stylish pendant lighting. It addresses common challenges, outlines best practices, and explores various types of pendant lights and their installation requirements, all presented in a factual and objective manner.
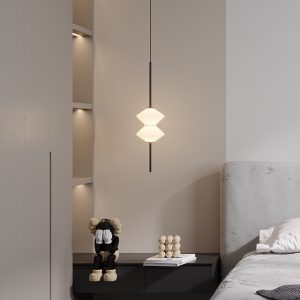
Pendant lights, often suspended from the ceiling by a rod or chain, serve as both functional illumination and decorative focal points within a space. Their versatility allows for diverse applications, from task lighting over kitchen islands to ambient illumination in dining areas. Understanding the fundamental components and considerations associated with pendant lighting is crucial for successful installation.
Anatomy of a Pendant Light
A typical pendant light comprises several key elements:
- Canopy (or ceiling plate): This component covers the electrical junction box in the ceiling and provides the mounting point for the fixture.
- Suspension System: This can be a rigid rod, a flexible chain, or a fabric-covered cord, determining the pendant’s hang height and aesthetic.
- Lamp Holder (or socket): This houses the light bulb and connects it to the electrical wiring.
- Shade: The shade directs and diffuses light, influencing the character and intensity of the illumination. Shades come in numerous materials, shapes, and sizes, ranging from exposed bulbs to opaque cylinders.
- Electrical Wiring: Internal wiring runs from the lamp holder through the suspension system to the canopy, where it connects to the household electrical supply.
Factors Influencing Installation Complexity
Several factors can impact the ease or difficulty of pendant light installation. Awareness of these elements before commencing work can help mitigate potential issues and ensure a smoother process. These include:
- Existing Wiring and Junction Box: The presence of a pre-existing, accessible, and correctly wired junction box significantly simplifies installation. Conversely, installing a new junction box or extending wiring will necessitate more involved electrical work, potentially requiring a qualified electrician.
- Ceiling Material: Different ceiling materials, such as drywall, plaster, or concrete, require specific mounting hardware and techniques to ensure secure attachment. Drywall anchors, toggle bolts, and masonry anchors are examples of such specialized hardware.
- Fixture Weight and Size: Heavier and larger pendant lights may require reinforced mounting hardware or additional support within the ceiling structure to prevent sagging or accidental detachment.
- Height and Accessibility: Installing pendants in high ceilings or in locations with limited accessibility can present ergonomic challenges, often necessitating ladders, scaffolding, or extended reach tools.
- Type of Pendant: Integrated LED pendants, for instance, may have different wiring requirements than traditional incandescent or halogen fixtures. Multi-light pendants, which include several individual lights connected to a single canopy, can also introduce additional wiring complexity.
Pre-Installation Planning and Safety
Thorough planning and strict adherence to safety protocols are paramount for any electrical installation project, including pendant lighting. Neglecting these steps can lead to inefficiencies, property damage, or personal injury.
Assessing the Installation Site
Before purchasing or installing a pendant light, a detailed assessment of the proposed installation site is essential. This survey acts as a compass, guiding your choices and preparing you for the journey ahead.
- Junction Box Verification: Locate the existing electrical junction box. Confirm its type (e.g., standard ceiling box, fan-rated box) and ensure it is securely mounted and capable of supporting the weight of the intended fixture. Inspect the existing wiring for damage or signs of overheating.
- Ceiling Structure Inspection: Understand the composition of your ceiling. Determine if it is hollow (e.g., drywall over joists) or solid (e.g., concrete slab). This information informs your choice of mounting hardware.
- Height and Clearance Considerations: Measure the ceiling height and determine the desired hanging height for the pendant. Ensure there is adequate clearance between the pendant and any obstructions, such as doors, windows, or furniture, to prevent accidental contact. Consider the visual impact: a pendant too high can feel disconnected, while one too low can impede movement or conversation.
- Power Source and Switching: Identify the circuit breaker that controls the power to the junction box. Confirm the presence of a wall switch that will control the pendant light. If a new switch is required, plan for its installation.
- Aesthetic Integration: Consider how the pendant light will complement the existing décor and overall lighting scheme of the room. Its style, size, and light output should align with the functional and aesthetic goals for the space.
Essential Tools and Materials
Having the correct tools and materials readily available before beginning installation will streamline the process and prevent unnecessary interruptions.
- Basic Hand Tools: A screwdriver set (Phillips and flathead), wire strippers, needle-nose pliers, and a utility knife are fundamental for most electrical work.
- Measuring Tools: A tape measure is vital for accurate placement and height adjustment.
- Safety Equipment: A non-contact voltage tester (or multimeter) is indispensable for verifying that power to the circuit is off. Safety glasses are recommended to protect eyes from dust or debris. Insulated gloves can provide an additional layer of protection, especially when working with live wires (though the circuit should always be off).
- Mounting Hardware: Depending on ceiling material and fixture weight, you may need various anchors (e.g., toggle bolts, winged anchors, expanding metal anchors for drywall; masonry anchors for concrete), screws, and washers. Most pendant lights include basic mounting hardware, but supplementary items may be required.
- Ladder or Stepladder: Ensure it is stable, rated for your weight, and tall enough to safely reach the ceiling.
- Wire Nuts (or Wago connectors): These are used to securely join electrical wires.
- Electrical Tape: For insulation and securing wire connections.
Safety Protocols
Safety must always be the top priority. Adhering to these protocols is non-negotiable.
- Turn Off Power: The most critical step. Locate the circuit breaker controlling the fixture’s power and switch it to the “OFF” position. It is advisable to also place a “DO NOT OPERATE” tag on the breaker to prevent accidental re-energization.
- Verify Power is Off: Use a non-contact voltage tester to confirm that there is no electrical current present in the wires at the junction box. Test both wires (hot and neutral) and the ground wire.
- Work with a Partner: For tasks involving ladders or handling heavy fixtures, having a second person can significantly enhance safety and efficiency.
- Read Instructions: Always consult the manufacturer’s installation instructions specific to your pendant light. These instructions often contain important details regarding wiring, mounting, and weight limitations.
- Proper Ladder Use: Ensure the ladder is placed on a stable, level surface. Do not overreach or stand on the top rung.
- Insulated Tools: Whenever possible, use tools with insulated handles to minimize the risk of electrical shock.
Step-by-Step Installation Process
This section outlines a general procedure for installing a pendant light. Specific steps may vary depending on the fixture’s design and existing electrical setup. This is a framework, and the manufacturer’s instructions for your specific fixture remain the definitive guide.
Disconnecting the Old Fixture (if applicable)
If replacing an existing fixture, begin by carefully removing the old one.
- Safety First: Confirm the power to the circuit is OFF using your voltage tester.
- Remove Canopy/Shade: Detach any decorative covers or shades that conceal the mounting hardware.
- Unscrew Mounting Hardware: Loosen the screws or nuts that secure the old fixture’s canopy to the junction box.
- Support Fixture: While supporting the fixture’s weight, carefully lower it to expose the wiring connections.
- Disconnect Wires: Untwist the wire nuts or release the quick connectors attaching the old fixture’s wires to the household wiring. Typically, there will be three connections: black (hot), white (neutral), and bare copper or green (ground). Keep these wires separated to avoid accidental contact.
- Remove Old Mounting Bracket: If the new fixture comes with its own mounting bracket, remove the old one.
Preparing the New Fixture
Review the manufacturer’s instructions for assembling any components of the new pendant light before mounting.
- Adjust Suspension Length: Most pendant lights allow for adjustment of the hanging height. This is typically done by shortening the rod, chain, or cord. For rods, sections may be added or removed. For chains, links can be removed with pliers. For cords, the excess is often coiled within the canopy or cut to length. Plan for an appropriate height beforehand. As a guideline, for pendants over a dining table, the bottom of the pendant is often 30-36 inches above the tabletop.
- Attach Mounting Bracket: Secure the new mounting bracket to the electrical junction box in the ceiling using the provided screws. Ensure it is firmly attached and level. Some brackets incorporate a ground screw; attach the household ground wire to this screw.
Wiring Connections
This stage requires careful attention to detail for safe and functional operation. Treat wires as if they are live, even after verifying the power is off.
- Identify Wires: In most modern installations, household wiring colors follow a standard:
- Black (or red): Hot wire (carries electrical current).
- White: Neutral wire (completes the circuit).
- Bare Copper or Green: Ground wire (safety feature, redirects fault currents).
Pendant light wiring colors often match these conventions.
- Strip Wires: If the insulation on the fixture’s wires is not already stripped, use wire strippers to expose approximately 1/2 to 3/4 inch of bare wire at the ends. Do the same for household wires if necessary.
- Connect Ground Wires: Twist the fixture’s ground wire (bare copper or green) together with the household ground wire (bare copper or green). Secure them with a wire nut. If the mounting bracket has a green ground screw, loop the household ground wire around it before connecting it to the fixture’s ground wire.
- Connect Neutral Wires: Twist the fixture’s neutral wire (white) together with the household neutral wire (white). Secure them with a wire nut.
- Connect Hot Wires: Twist the fixture’s hot wire (black) together with the household hot wire (black). Secure them with a wire nut.
- Tuck Wires: Carefully fold the connected wires and tuck them neatly into the electrical junction box. Ensure no bare wire is exposed outside the wire nuts.
Mounting the Fixture
With wiring complete, the pendant light can now be securely affixed to the ceiling.
- Align Canopy: Carefully align the canopy of the pendant light with the mounting bracket, ensuring that no wires are pinched.
- Secure Canopy: Fasten the canopy to the mounting bracket using the screws, nuts, or decorative caps provided. Tighten them firmly but avoid over-tightening, which can damage the canopy or bracket.
- Install Bulbs: Screw in the appropriate light bulbs according to the fixture’s specifications (wattage, base type).
- Attach Shade/Diffuser: If the fixture includes a decorative shade or diffuser, install it now following the manufacturer’s instructions.
Testing and Final Adjustments
The final phase involves confirming functionality and making any necessary refinements.
- Restore Power: Go back to the circuit breaker and switch the power back ON.
- Test Light: Operate the wall switch to turn the pendant light ON and OFF. Verify that it illuminates correctly.
- Visual Inspection: Step back and inspect the installed pendant. Ensure it hangs straight and is at the desired height. Make any minor adjustments to the suspension if possible. Check for any loose components or gaps between the canopy and the ceiling.
- Clean Up: Collect all tools and dispose of any packaging or waste materials.
Advanced Installation Considerations
While basic pendant light installation is often straightforward, certain scenarios may require additional planning or professional intervention.
Dealing with No Existing Junction Box
If there is no existing junction box at the desired pendant location, creating a new electrical point is necessary. This involves:
- Locating Power Source: Tapping into an existing electrical circuit from a nearby switch, outlet, or junction box.
- Routing Wire: Running new electrical wire (e.g., Romex) from the power source to the desired pendant location, often through walls or ceiling joists.
- Installing a New Box: Cutting a hole in the ceiling and installing a new work box (old-work box or pancake box for lightweight fixtures).
- Professional Expertise: This process typically requires a more advanced understanding of electrical wiring and may be best left to a licensed electrician to ensure compliance with local electrical codes and safety.
Installing Multi-Light Pendants
Multi-light pendants, featuring multiple light sources from a single canopy, introduce slightly more complex wiring.
- Increased Connections: Each individual light within the pendant will have its own set of hot, neutral, and ground wires that need to be connected to the corresponding household wires within the canopy.
- Space Management: The canopy of a multi-light pendant must be large enough to accommodate all the wire connections and wire nuts. Careful wire management is essential to fit everything neatly.
- Weight Distribution: Due to the increased number of lights, multi-light pendants can be heavier. Ensure the junction box and mounting hardware are rated to support the cumulative weight.
Dimmer Switch Compatibility
Many individuals choose to install dimmer switches with pendant lights to control light intensity and ambiance.
- Bulb Compatibility: Ensure the light bulbs you use (LED, incandescent, CFL) are rated as “dimmable.” Using non-dimmable bulbs with a dimmer switch can cause flickering, humming, or premature bulb failure.
- Dimmer Type: There are different types of dimmer switches designed for specific bulb technologies (e.g., LED dimmers, incandescent dimmers). Select a dimmer switch compatible with your chosen bulbs and the total wattage of your pendant light.
- Wiring: Replacing a standard switch with a dimmer switch typically involves similar wiring steps, but always follow the dimmer switch manufacturer’s instructions.
Maintenance and Troubleshooting
Once installed, proper maintenance ensures longevity and continued performance.
Routine Maintenance
- Cleaning: Regularly clean the pendant shade and bulbs with a soft, dry cloth to remove dust and debris. For glass or metal shades, a mild, non-abrasive cleaning solution can be used, ensuring the fixture is off and dry before re-energizing.
- Bulb Replacement: When a bulb burns out, replace it with a bulb of the same type and wattage as specified by the manufacturer. Using an incorrect bulb can damage the fixture or present a fire hazard. Ensure the power is off before replacing bulbs.
- Tightening Connections: Periodically check that mounting screws and canopy fasteners are snug. Over time, vibrations can sometimes loosen connections.
Common Troubleshooting Issues
- Light Not Working:
- Check Bulb: Ensure the bulb is screwed in correctly and not burnt out.
- Check Power: Verify the circuit breaker is ON.
- Check Switch: Ensure the wall switch is in the ON position.
- Inspect Wiring: With power off, carefully re-check wire connections in the junction box to ensure they are secure.
- Flickering Light:
- Loose Connections: Power off and check wire nuts for secure connections.
- Incompatible Dimmer/Bulb: If using a dimmer, ensure both the bulbs and the dimmer switch are compatible and properly rated.
- Overloaded Circuit: If other lights or appliances on the same circuit are also flickering, the circuit may be overloaded.
- Humming Noise:
- Incompatible Dimmer: Some dimmer switches, particularly older models or those not specifically designed for LED bulbs, can cause a humming noise.
- Loose Components: Occasionally, loose internal components of the fixture can hum.
- Tripping Breaker: This is a serious indicator of an electrical fault.
- Overload: The circuit may be drawing too much power.
- Short Circuit: A hot wire may be touching a neutral wire or ground wire, causing a direct path for current. Immediately turn off power to the circuit and consult a qualified electrician. Do not attempt to reset the breaker repeatedly without identifying and resolving the issue.
By following these guidelines, you can navigate the process of installing stylish pendant lighting with confidence and ensure a safe, aesthetically pleasing, and functional outcome. When in doubt, particularly regarding complex electrical work, the expertise of a licensed electrician is always recommended.
Hot Posts
- 10 Stunning Bedroom Design Ideas to Transform Your Sleep Space

- 5Funky Kitchen Gadgets to Keep Your Home Cooking Delicious

- A Home Garden For All Seasons

- Add Warmth and Style to Your Home with a Wooden Pendant Lamp
- Adding Drama to Your Decor With a Pendant XL Light
- Adorable Table Lamp for Kids’ Room

- Affordable Solar Garden Lights: A Smart Purchase
- Antique Table Lamps & Lighting at Auction


Leave a Reply